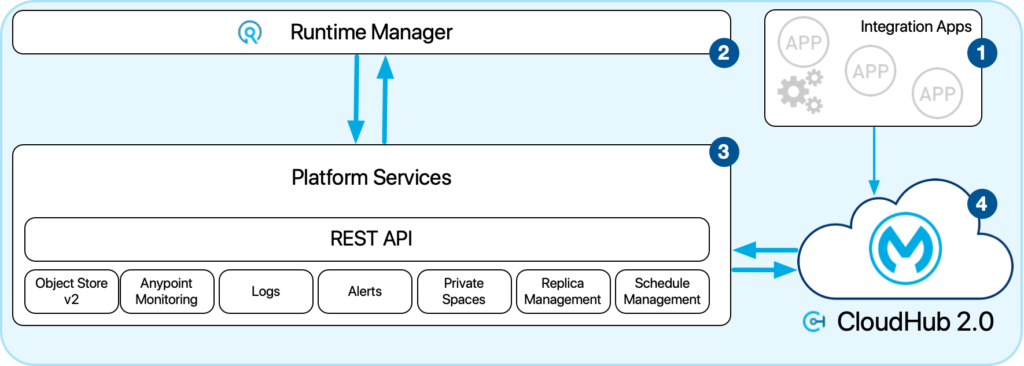
Creating a Private Space in CloudHub 2.0 is a process that allows for more secure and controlled management of your applications and resources within the MuleSoft Anypoint Platform. Here’s a step-by-step guide on how to do it:

Step 1: Log in to Anypoint Platform
- Access the Anypoint Platform: Begin by logging into your Anypoint Platform account at anypoint.mulesoft.com.
- Navigate to the Dashboard: Once logged in, you will be directed to the main dashboard.
Step 2: Access the Runtime Manager
- Open Runtime Manager: In the navigation menu, locate and click on “Runtime Manager.” This is where you manage your applications and environments.
Step 3: Navigate to Private Spaces
- Locate Private Spaces Option: Within the Runtime Manager, find the section or tab for ‘Private Spaces’. This might vary slightly depending on the layout and version of the platform interface.

Step 4: Create a New Private Space
- Initiate Creation: Click on a button or link that says ‘Create New’, ‘Add New’, or ‘New Private Space’.
- Enter Details:
- Provide a Name for your Private Space. Choose a name that clearly identifies the purpose or nature of the space.
- Select a Region where you want the Private Space to be located. This should ideally be the region closest to your user base or where your other resources are hosted.
- Optionally, you can add a Description for additional details about the Private Space.

Step 5: Configure the Private Space
- Set Up Network Settings: Configure network settings such as VPC (Virtual Private Cloud) and VPN (Virtual Private Network) if required. This step is crucial for integrating your Private Space with internal networks.
- Define Access Controls: Set up access controls and permissions to manage who can deploy and manage applications within this Private Space.
Step 6: Review and Create
- Review the Configuration: Before finalizing, review all the settings and configurations to ensure they are correct and meet your requirements.
- Create the Private Space: Click on ‘Create’, ‘Submit’, or a similar button to create the Private Space.
Step 7: Deployment and Management
- Deploy Applications: Once the Private Space is created, you can start deploying applications to it. Ensure that these applications are configured to operate within the Private Space environment.
- Monitor and Manage: Regularly monitor the performance and security of your Private Space and the applications within it. Make adjustments as needed for optimization.
Additional Tips
- Security Practices: Ensure that you follow best practices for security, especially if your Private Space will handle sensitive data.
- Documentation: Keep documentation of your configurations and settings for future reference and troubleshooting.
- Regular Updates: Keep your Private Space and its applications updated with the latest patches and versions.
By following these steps, you can successfully create and manage a Private Space in CloudHub 2.0, giving you a more secure and controlled environment for your MuleSoft applications.
Why Create Private Spaces in CloudHub 2.0
Private Spaces in CloudHub 2.0 are used for several key reasons, primarily revolving around enhanced security, control, and customization of your application deployment environment within the MuleSoft Anypoint Platform. Here’s why they are significant:
1. Enhanced Security
- Isolation: Private Spaces provide an isolated environment for your applications, reducing the risk of unauthorized access and data breaches.
- Controlled Access: They allow for more granular control over who can access your applications and data.
- Custom Security Policies: You can implement custom security policies that are tailored to the specific needs of your organization.
2. Improved Performance and Reliability
- Dedicated Resources: Private Spaces often come with dedicated resources, which means your applications can perform more consistently without being affected by other tenants’ usage.
- Optimized Network Performance: You can optimize network configurations specific to your applications’ needs, improving overall performance.
3. Compliance and Data Residency
- Regulatory Compliance: For businesses that must comply with specific regulations (like GDPR, HIPAA), Private Spaces can help in meeting those compliance requirements, especially regarding data handling and storage.
- Data Residency: You can ensure data residency by choosing the region for your Private Space, which is essential for compliance in certain jurisdictions.
4. Custom Networking Configuration
- VPN and VPC Configurations: Private Spaces allow for the configuration of VPNs and VPCs, enabling secure connections to your on-premises or other cloud environments.
- Controlled Network Traffic: You have greater control over the ingress and egress of network traffic, which enhances security and performance.
5. Application Management and Scaling
- Application Lifecycle Management: They offer a controlled environment for managing the entire lifecycle of your applications, from development and testing to production.
- Scalability: Private Spaces provide the ability to scale your applications as needed, depending on the demand and usage patterns.
6. Customization and Flexibility
- Tailored Environments: They offer the flexibility to create environments that are tailored to the specific needs of your applications, such as custom configurations and integrations.
- Integration with Existing Systems: Private Spaces can be configured to integrate seamlessly with existing systems and infrastructure, ensuring compatibility and smooth operations.
7. Improved Monitoring and Troubleshooting
- Dedicated Monitoring Tools: Private Spaces often come with their own set of monitoring tools, allowing for better visibility into application performance and issues.
- Easier Troubleshooting: With an isolated environment, troubleshooting and identifying issues can be more straightforward, leading to quicker resolution times.
In summary, Private Spaces in CloudHub 2.0 are used to provide a more secure, compliant, and controlled environment for deploying and managing applications. They offer benefits in terms of performance, security, customization, and integration capabilities, making them an essential feature for businesses with specific compliance, security, and performance needs.